Wednesday, October 7, 2015

How To Resize Images In Photoshop

facebooktwittergoogle_pluspinterest
Written by Steve Patterson. Resizing an image is one of the most commonly used skills in all of Photoshop. It's so common, in fact, that even people who know virtually nothing about Photoshop still manage to use it to resize their images, which should give you an idea of how easy it is to do.
In this tutorial, we'll learn how to resize images, as well as a general rule to keep in mind so your resized photos remain crisp and sharp. I'll be using Photoshop CS5 here but the steps are the same with any recent version of the program.
Here's an image I have open on my screen:
A small hut in Mexico. Image © 2012 Photoshop Essentials.com
The original photo.
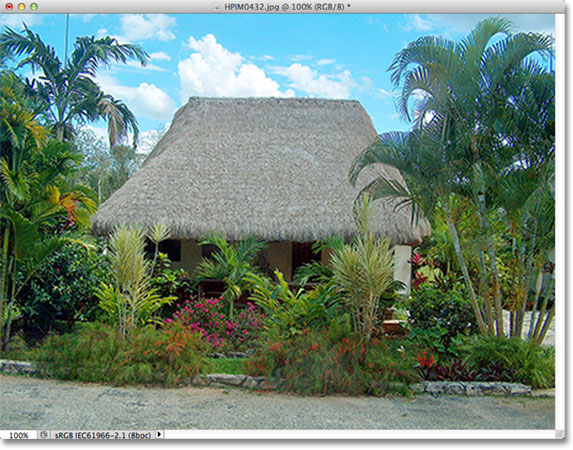
This is a photo taken on a trip to Mexico. Of course, the original version of the photo was much larger than what we're seeing here, but I've resized it and made it smaller so it fits better on the page. How did I do that? It's easy. To resize an image in Photoshop, we use the Image Size command which we can get to by going up to the Imagemenu in the Menu Bar along the top of the screen and choosing Image Size:
Selecting the Image Size command in Photoshop. Image © 2012 Photoshop Essentials.com
Go to Image > Image Size.
This will bring up the Image Size dialog box, as shown below:
The Image Size dialog box in Photoshop. Image © 2012 Photoshop Essentials.com
The Image Size dialog box.
This screenshot of the Image Size dialog box was taken immediately after I opened the original photo, before I resized it to a smaller version for displaying on the page. If you look closely, you'll notice that the dialog box is divided into two main sections - Pixel Dimensions and Document Size - each showing different measurements. Since this tutorial is all about how to resize an image, we only need to concern ourselves with the top section, Pixel Dimensions, since it's the one that controls the actual, physical dimensions (in pixels) of the photo.
Let's look more closely, then, at the Pixel Dimensions section, which tells us two things about our image. First, if we look directly to the right of the words "Pixel Dimensions", we can see the current file size of the image. In my case, it's telling me that my photo is 14.6 M (the "M" stands for megabytes, or "millions of bytes"):
The current file size as shown in the Image Size dialog box. Image © 2012 Photoshop Essentials.com
The current file size is displayed to the right of the words "Pixel Dimensions".
Knowing the file size of the image can be useful if you want to compare the size of the original version with the resized version, but it doesn't help us actually resize our image. For that, we need the other bit of information that the Pixel Dimensions section is telling us - the current Width and Height of our image:
The current width and height of the image, in pixels, as shown in the Image Size dialog box. Image © 2012 Photoshop Essentials.com
The current width and height of the image, in pixels.
Here, we see that my original photo was 2608 pixels wide by 1952 pixels high. At that size, I'd have no problem printing a great looking 8x10, but I needed a smaller version, one that would fit better on these pages. So how did I make it smaller? I simply changed the numbers in the Width and Height boxes to what I needed! I'll set the new width for my image to 900 pixels and the height to 647 pixels (of course this is just an example, you can enter whatever size you need):
Changing the Width and Height of the image in the Image Size dialog box. Image © 2012 Photoshop Essentials.com
Entering new Width and Height values for the image.
To change the Width and Height values, simply double-click inside one of the two boxes (either Width or Height), which will highlight the number currently showing in the box, and then type a new value. When you're done, click the OK button and Photoshop will resize your image to the new dimensions you've specified.
You can also resize your image by a percentage of the original image size rather than typing in a specific pixel value. If you look to the right of the Width and Height value boxes, you'll notice that the measurement type is currently set to pixels, but if you click on either the word "pixels" or the arrow to the right of the word, a drop-down menu will appear which lets you change the measurement type to percent:
Changing the measurement type from pixels to percent in the Image Size dialog box. Image © 2012 Photoshop Essentials.com
Changing the measurement type from pixels to percent.
Once you've chosen percent as your measurement type, the Pixel Dimensions section will display the width and height of your image as a percentage rather than a pixel value. Resizing the image using a percentage is done the same way as if you were using pixel values. Just double-click inside the Width or Height value box and type in a new percentage. When you're done, click the OK button and Photoshop will resize the image to whatever percent value you entered.
You'll notice, unless you've changed the default settings, that when you enter in a new Width or Height value, the other value changes automatically. In other words, if you try to change the value for the width of your image, the height will change along with it. That's because by default, Photoshop keeps the original aspect ratio of the image intact when you resize it, which is usually what you want. Normally, you wouldn't change the width of a photo without changing the height as well, otherwise things will look distorted. Photoshop lets us know that the width and height values of the image are currently linked together by displaying a linked icon to the right of the values:
An icon tells us the Width and Height values of the photo are linked together. Image © 2012 Photoshop Essentials.com
This icon tells us that the Width and Height values are currently linked together.
If you look near the bottom of the Image Size dialog box, you'll see the Constrain Proportions option which controls whether the width and height are linked. By default, the option is selected, but if you need to change the width and height separately, simply uncheck this option:
The Constrain Proportions option in the Image Size dialog box. Image © 2012 Photoshop Essentials.com
The Constrain Proportions option keeps the aspect ratio intact but can be disabled if needed.
Resizing And Image Quality
Resizing images in Photoshop may be easy, but there's something very important to keep in mind when it comes to maintaining image quality. In general, it's okay to make a photo smaller than its original size, but you want to avoid making it larger whenever possible. Let's look at an example.
Let's say I need to make the width and height of my photo smaller by 50 percent. To do that, in the Image Size dialog box, I'll simply change both the Width and Height values to 50 percent:
Resizing the image by 50 percent. Image © 2012 Photoshop Essentials.com
Reducing the size of the image.
I'll click OK in the top right corner of the Image Size dialog box, at which point Photoshop closes the dialog box and resizes my image. Since I made both the width and height smaller by 50 percent, the photo is now one fourth of its original size:
The image after resizing it by 50 percent in Photoshop. Image © 2012 Photoshop Essentials.com
The image after resizing the width and height by 50 percent.
As we can see, the photo is now much smaller but the overall image quality remains pretty consistent. Let's see what happens, though, if I take this smaller image and try to enlarge it back to its original size. To do that, I'll re-open the Image Size dialog box by going up to the Image menu at the top of the screen and choosing Image Size, then I'll set both the Width and Height values to 200 percent:
Resizing the photo by 200 percent in Photoshop. Image © 2012 Photoshop Essentials.com
Changing the Width and Height values to 200 percent.
I'll click OK to accept the values and close out of the Image Size dialog box, at which point Photoshop enlarges the image, making it four times the size it was a moment ago:
The image after resizing it by 200 percent in Photoshop. Image © 2012 Photoshop Essentials.com
The image after increasing its size by 200 percent.
Let's compare the image quality of the enlarged version with that of the original version:
A small hut in Mexico. Image © 2012 Photoshop Essentials.com
The original photo.
By enlarging the image, I've managed to return it to its original size, but when we compare the quality with that of the original, the enlarged version clearly doesn't look as good. We've lost a lot of detail in the image, and it's starting to look soft and blurry. If I was to enlarge it even further, the image quality would grow progressively worse.
Here's why. When you use the Image Size command to make a photo smaller, Photoshop makes it smaller essentially by throwing away pixels. It just takes some of the pixels from the image and tosses them out the virtual window. Fortunately, Photoshop is really good at knowing which pixels to throw away without sacrificing image quality, so making our images smaller isn't usually a problem.
The problem comes in when we ask Photoshop to make our images larger. If Photoshop makes them smaller by tossing pixels away, how do you think it makes them larger? If you answered, "By adding pixels to the image", you'd be right! But here's the bigger question. Where does Photoshop get these new pixels from that it's adding to the image? If you answered, "Um, I'm not sure. I guess it just kind of makes them up out of thin air", you'd be right again!
And therein lies the problem. When Photoshop makes an image larger, it has to add pixels that were not there before, and since Photoshop wasn't on the scene when you took the photo, it has no idea what a larger, more detailed version of the image should actually look like, which means it has to guess. Of course, Photoshop is a very powerful program and its guesses are based on some very complicated and advanced math, but at the end of the day, it's still just a guess, and it's not going to guess correctly. Bottom line, the larger you try to make your image, the worse your image is going to look. Instead of the sharp, highly detailed version you were hoping for, you'll get something that looks dull, soft and blurry.
Source: http://www.photoshopessentials.com/essentials/image-resizing/

Wednesday, September 30, 2015

See more about Adobe Photoshop at https://helpx.adobe.com/photoshop/tutorials.html.
In this site you would be able to see what really is to be a photo editor. 

Wednesday, September 16, 2015

Everyone likes photo effects, especially those that are easy to create and can transform your ordinary shots into stunning artworks. Photo effects will never go out of style. Adobe Photoshop is a superb tool to edit your pictures, so go on and take the best of it. If you’re looking for cool Photoshop guides to follow, this showcase was made specially for you.
There are 50 stunning Photoshop photo effect tutorials below ranging from tricks to give your photo the hipster or Instagram filter look, or the tilt-shift (miniature) look, from reducing wrinkles to giving porcelain skin to your subjects. Best of all, all of them are extremely easy and quick. Feel free to choose the guide you like the most and follow it in order to create your own masterpiece!
1. Video Tutorial: Enhance Detail Using Correction. This tutorial will lead you through three common ways to apply local tone and color adjustments to your image.
2. Retouch Images with Frequency Separation. In this Photoshop tutorial you’ll learn to retouch an image from start to finish, using a technique that lets you process not only certain image area, but even different detail levels.
3. How to Digitally Add Shadow Depth of Field. This tutorial will tell you how to digitally simulate a shadow depth of field with Photoshop.
4. Video Tutorial: Lomograph. How to Make a Photo Look Vintage & Retro. Learn how to add a retro vintage look to your picture with a cool lomographic effect.
5. Tilt Shift Photoshop Tutorial: How to Make Fake Miniature Scenes. Create a stunning image with Tift Shift effect following this simple tutorial.
6. HDR: Exposure Blending Tutorial. This tutorial will tell you how to achieve a high dynamic range (HDR) version of the image using Photoshop.
7. Video tutorial: Control Tonality with Photoshop’s Black & White Filter. Use black and white processing tricks to enhance your color photos.
8. How to Make Instagram Filters in Photoshop: Earlybird. Create Instagram Earlybird filter following this easy Photoshop tutorial.
9. Photoshop tutorial: Advanced Compositing Techniques. In this tutorial you’ll get to know how to incorporate the elements into one image and get a stunning dreamy poster, inspired by spring.
10. Create a Realistic Photo Composite From a Sketch. In this tutorial you’ll learn to combine a few photos to achieve a realistic scene of the locomotive passing through a desert landscape.
11. Photoshop Tutorial: Wrinkle Reduction. In this guide you’ll find a proper explanation on how to retouch your photo.
12. Black & White Is the Key to Better Color. A brief tutorial on how to improve your color image using black and white.
13. How to Make Your Photos Look Hipster. This cool video tutorial will walk you through the process of adding amazing light lomo effect to your image to make it look ‘Hipster’.
14. An Unmissable Photoshop Tutorial. An awesome video tutorial on how to retouch your image in order to make it look super cool.
15. Photoshop Watercolor Painting Effect. Make your image look like a watercolor painting with Photoshop.
16. Create an Emotional, Molten, Shattered Statue in Photoshop. Use layer masks, adjustments, and a few blending and painting techniques to create a stunning artwork.
17. Create Distorted Typography in Photoshop. In this tutorial a method of distorting typography and working with mixed media to bring a unique look to an image is described.
18. Photoshop Tutorial: Create an Amazing Summer Flyer Design. This guide will teach you to create a summer flyer design combining a few elements into one image.
19. Dazzling Dance Photo Manipulation. In this detailed Photoshop tutorial you’ll get to know how to mix images and to add specific effects to create a smashing artwork.
20. Quick Tip: Retroize Your Photos in Seconds. Add a professional retrostyle look to your image using color layers in Photoshop CS6.
21. Amazing Photo Manipulation “World on the Tissue” in Photoshop. Create a cool wallpaper for your desktop in Photoshop following this guide.
22. Turn Day into Night in Photoshop with Colour-shifted Exposure. Sometimes your camera does not allow you to shoot quality pictures at night hours, so use Photoshop to turn day into night.
23. Video tutorial: Harmonise Tricky Tones and Colours. Use the Color Sampler tool and Curves layers to harmonize two different images together.
24. Enhance Your Image with Selective Color Adjustments. In this tutorial you’ll see a nondestructive process for color editing and image retouching.
25. Video tutorial: Generate a Realistic Heat Haze in After Effects CS6. Learn how to create a realistic heat haze effect in Photoshop for landscape photography.
26. Using Textures & Blending Modes in Photoshop. This Photoshop tutorial will tell you how to use blending modes to adjust textures.
27. Quick Tip: Photographic Tones Good for Photo Re-Touch. Learn how to add Color lookup and Oil painting effects from filter section in Photoshop CS6.
28. Super Cool Watercolor Effect in 10 steps in Photoshop. Use watercolor brushes with Photoshop to create a smashing artwork.
29. Add Quick Effects to Your Personal Photos. This tutorial will walk you through an easy process of adding cool effects to your personal photos.
30. How To Give Your Photos a Dark Processed Lomo Effect. Follow this simple Photoshop guide to give your images a dark lomo style effect with blue tones and high contrast.
31. Dramatic Skin Retouching Technique. In this tutorial you’ll get to know how to use an easy, but effective technique to create a hard dramatic skin effect.
32. Video tutorial: Match Tone and Color in Photoshop. This workflow will walk you through the process of recreating an atmosphere of a vintage film.
33. Instagram Your Images Using Photoshop. An easy and quick guide to add a Nashville effect from Instagram app to your photos.
34. How to Create Extraterrestrial Self Portrait. Learn how to turn an ordinary shot into an amazing artwork with this video Photoshop tutorial.
35. Video tutorial: Fix Frizzy Hair with Photoshop’s Oil Paint Filter. In this lesson you’ll learn how to smooth hair on the picture.
36. How to Create a Porcelain Skin Effect in Adobe Photshop CS6. Create a stunning porcelain skin effect following this Photoshop guide.
37. Instagram Quick Effect In Photoshop. In this Photoshop tutorial you’ll learn how to create a quick Instagram effect.
38. Vintage Yourself! The Easiest Way to Create Vintage Photo Effect. The easiest way to create a smashing retro vintage effect in Photoshop.
39. Video tutorial: Create a Pseudo-HDR Effect with Local contrast. This tutorial covers a simple Photoshop process for creating a local contrast effect in order to achieve a pseudo-HDR look.
40. How I Edited This Photo from Start to Finish. This tutorial will walk you through a procedure of creating an natural sunlight effect in Photoshop.
41. Photo Effects Week: Apply a Color Effect to a Photo. Learn to apply a cool color effect to your personal shots with this Photoshop tutorial.
42. Video Tutorial: Learn How to Recreate The Instagram Nashville Effect in Photoshop. From this video tutorial you’ll get to know how to create a Nashville Instagram effect that can be used for various images.
43. Quick Tip: Create Light Leaks and Lomo Effects Using Actions in Photoshop. In this quick and easy tutorial you’ll learn to add light leak and lomo effect to your favourite pictures.
45. Dreamy Photo Effect Tutorial. Give your pictures a dreamy look using gradients and adjustment layers in Photoshop.
46. Dave Hill Photo Effect: Quick Tutorial. A great Photoshop guide to add a stylish Dave Hill’s effect to your images.
47. Video tutorial: Complete the Vintage Toy Camera Aesthetic. Create an old Polaroid effect in Photoshop following this video tutorial.
48. How To Create a Movie Style Photo Effect in Photoshop. Retouch a photo to create an amazing cinematic movie effect with this Photoshop manual.
49. Video tutorial: Frequency Separation Sharpening in Photoshop. In this tutorial you’ll learn how to sharpen your picture using a high-quality frequency separation method.
50. After Effects Tutorial: Create Generative Textures for Print. A cool tutorial to create an awesome collage artwork.

Conclusion

Hopefully, you have found the perfect tutorial to follow and to improve your skills. Don’t hesitate to share your thoughts and final results in the comments section.